
AS accelerometer sensor
The accelerometer measures any force that causes acceleration in the x-, y-, or z-direction. Because the Finch is usually moving pretty slowly, the accelerometer mostly measures the acceleration due to gravity. When the Finch is sitting on a level surface, the acceleration due to gravity points through the base of the Finch, along the positive z-axis. If you instead position the Finch so that its beak is pointing at the ground, the acceleration due to gravity points along the positive x -axis. The accelerometer enables you to measure these differences.
AS Accelerometer Sensor Snap Shot
| Block Code | Copy and Paste Code |
|
|
use Libraries.Robots.BirdBrain.Finch Finch finch output "Press the A button each time you to want a reading" output "Press the B button to end program" repeat until finch:GetButton("B") repeat until finch:GetButton("A") end finch:SetBeak(0,100,0) output "X Acceleration: " + finch:GetAcceleration("x") output "Y Acceleration: " + finch:GetAcceleration("y") output "Z Acceleration: " + finch:GetAcceleration("z") finch:Pause(0.2) finch:StopAll() repeat until finch:GetButton("A") //pause end end finch:Disconnect() |
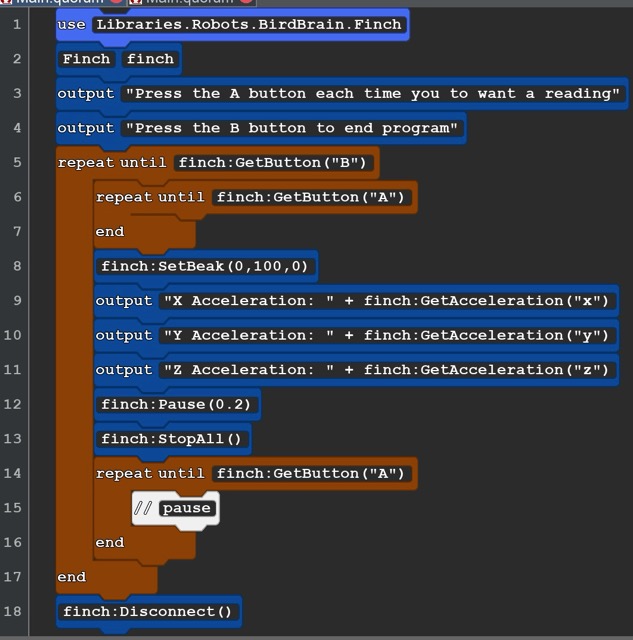
Howhis code works. Run the code. The robot is waiting for you to press the A or B button. The A button with display the XYZ accelertation at the moument you press it in in the computer console. This lets you repoistion the Finch. Try diferent poses like beak straight up or down, Try ttiping the Finch left or right till the wing is touching the ground. You might want to make a chart of the readings in those possitions. You out put can be posative or negative. The posative number show that accelration is increasing and negative number show the deacceleration or slowing down.
AS2
 |
| Copy and Paste |
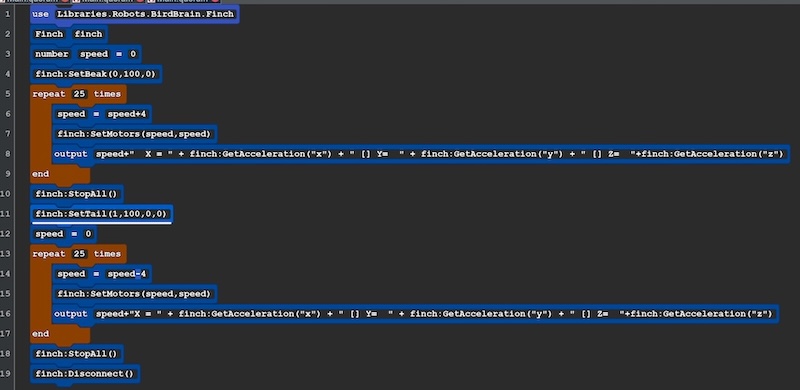
| use Libraries.Robots.BirdBrain.Finch Finch finch number speed =0 finch:SetBeak(0,100,0) repeat 25 times speed=speed+4 finch:SetMotors(speed,speed) output speed+" X = " + finch:GetAcceleration("x") + " [] Y= " + finch:GetAcceleration("y") + " [] Z= "+finch:GetAcceleration("z") end finch:StopAll() finch:SetTail(1,100,0,0) speed=0 repeat 25 times speed=speed-4 finch:SetMotors(speed,speed) output speed+"X = " + finch:GetAcceleration("x") + " [] Y= " + finch:GetAcceleration("y") + " [] Z= "+finch:GetAcceleration("z") end finch:StopAll() finch:Disconnect() |
Notes The Finch will move faster and faster, Stop, then move backwards faster and faster. The data will be collected on the console. Rember that the acceleration due to gravity would be masured on the Z axis as a negative number. |
Acceleration
Acceleration Sensor Code and Lesson Plans
Buttons
Buttons Sensor Code and Lesson Plans.
There are 5 buttons on the Finch 2.0. There is the bigger black button on the bottom. it is used to turn on and off the robot. On the front of the Micro-bit there are two push buttons labeled “A” and “B” and galvonic touch sensor called “LOGO”. These are sensors that can be used to control the robot. On the back of the micro
BS1 Using buttons with motors
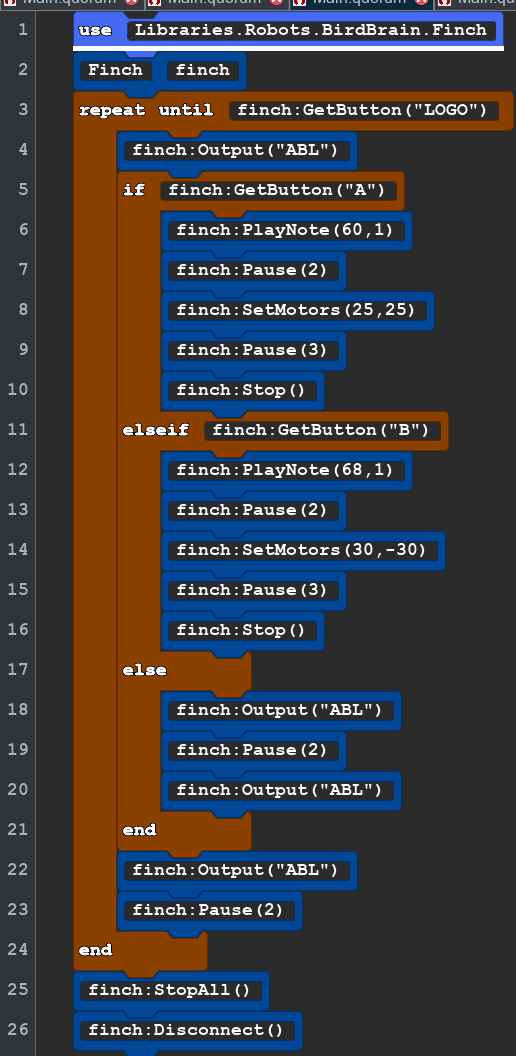 |
use Libraries.Robots.BirdBrain.Finch Finch finch repeat until finch:GetButton("LOGO") finch:Output("ABL") if finch:GetButton("A") finch:PlayNote(60,1) finch:Pause(2) finch:SetMotors(25,25) finch:Pause(3) finch:Stop() elseif finch:GetButton("B") finch:PlayNote(68,1) finch:Pause(2) finch:SetMotors(30,-30) finch:Pause(3) finch:Stop() else finch:Output("ABL") finch:Pause(2) finch:Output("ABL") end finch:Output("ABL") finch:Pause(2) end finch:StopAll() finch:Disconnect() |
|
BS2 Using button with Sound
| Block Code | Text Code for Copy and paste | |
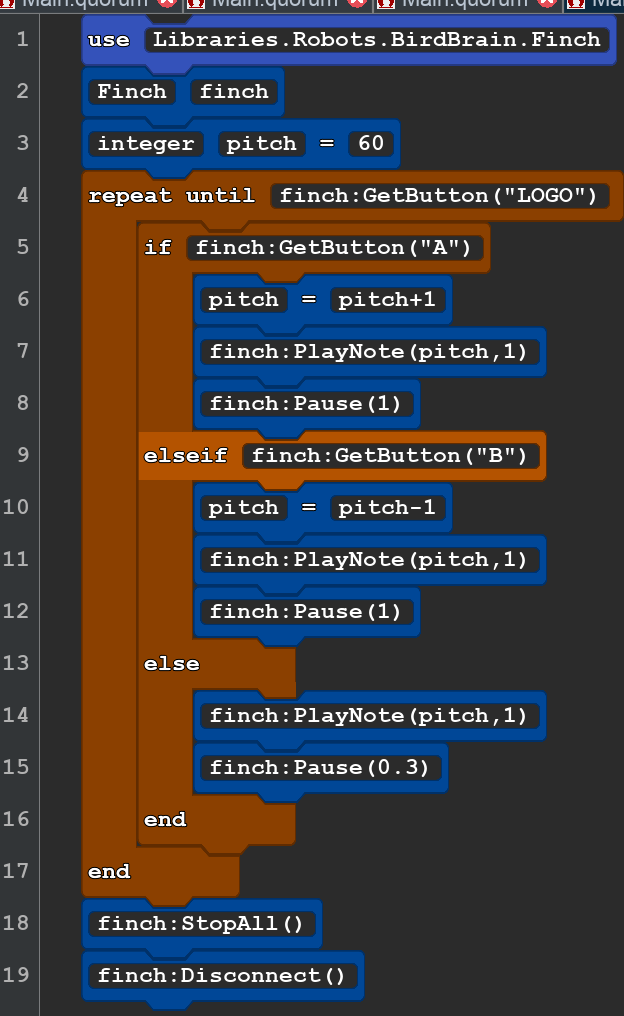 |
use Libraries.Robots.BirdBrain.Finch Finch finch integer pitch =60 repeat until finch:GetButton("LOGO") if finch:GetButton("A") pitch=pitch+1 finch:PlayNote(pitch,1) finch:Pause(1) elseif finch:GetButton("B") pitch=pitch-1 finch:PlayNote(pitch,1) finch:Pause(1) else finch:PlayNote(pitch,1) finch:Pause(0.3) end end finch:StopAll() finch:Disconnect() |
|
BS3 Buttons with Lights and Movement and Spoken Instrucations
| BS3 Buttons with Lights and Movement and Spoken Instrucations | Cut and Paste |
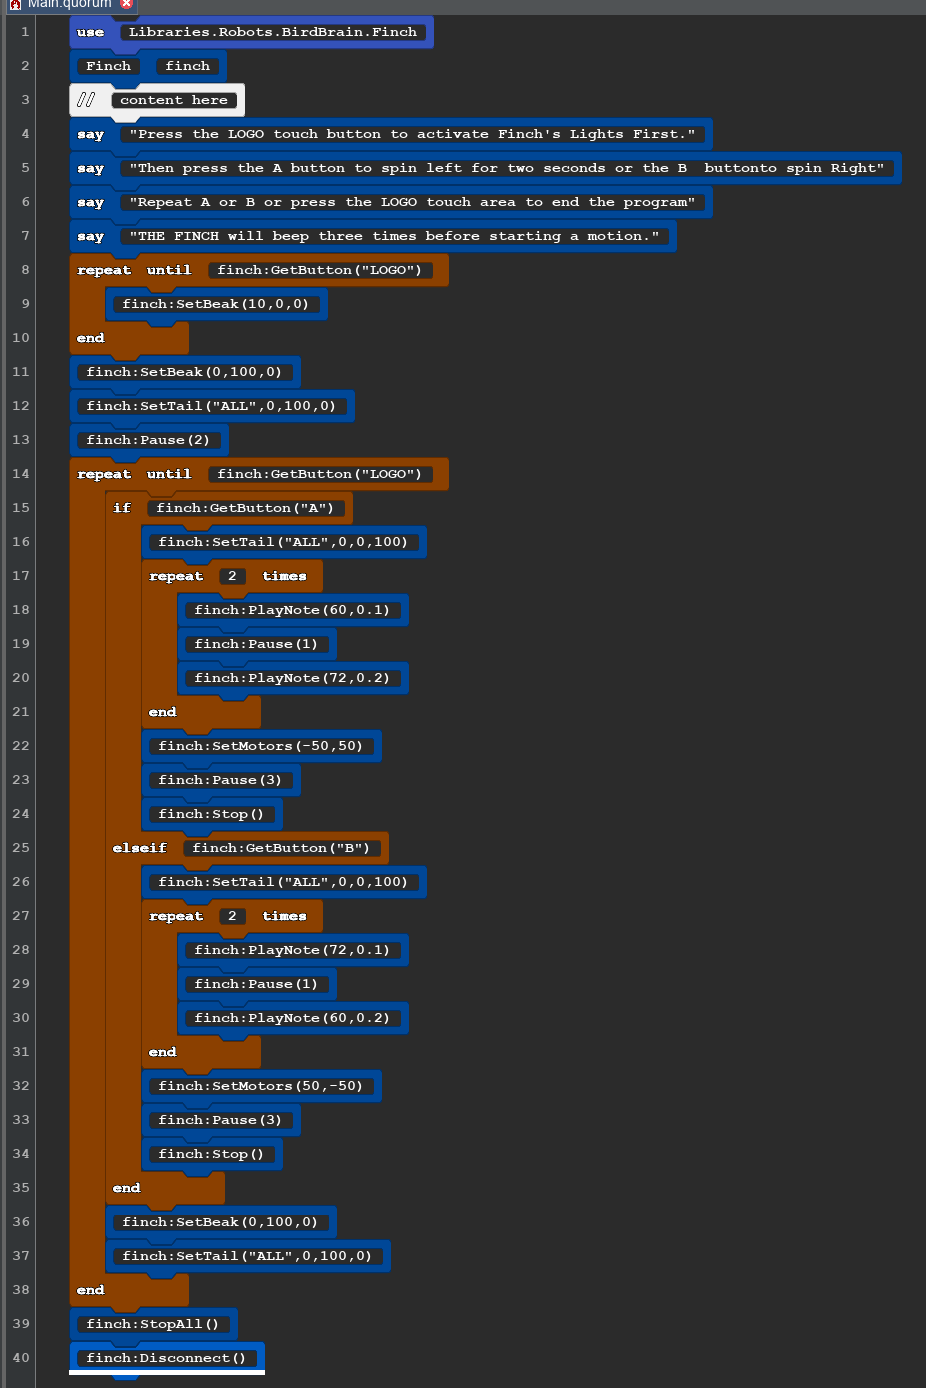 |
use Libraries.Robots.BirdBrain.Finch Finch finch //content here say"Press the LOGO touch button to activate Finch's Lights First." say "Then press the A button to spin left for two seconds or the B buttonto spin Right" say "Repeat A or B or press the LOGO touch area to end the program" say "THE FINCH will beep three times before starting a motion." repeat until finch:GetButton("LOGO") finch:SetBeak(10,0,0) end finch:SetBeak(0,100,0) finch:SetTail("ALL",0,100,0) finch:Pause(2) repeat until finch:GetButton("LOGO") if finch:GetButton("A") finch:SetTail("ALL",0,0,100) repeat 2 times finch:PlayNote(60,0.1) finch:Pause(1) finch:PlayNote(72,0.2) end finch:SetMotors(-50,50) finch:Pause(3) finch:Stop() elseif finch:GetButton("B") finch:SetTail("ALL",0,0,100) repeat 2 times finch:PlayNote(72,0.1) finch:Pause(1) finch:PlayNote(60,0.2) end finch:SetMotors(50,-50) finch:Pause(3) finch:Stop() end finch:SetBeak(0,100,0) finch:SetTail("ALL",0,100,0) end finch:StopAll() finch:Disconnect() |
| Lines 4-7 give spoken instructions. You can change Say to Display to show them on your computer screen. Pauses have been included to give the user time to move their hands after touching the button. You know have have found the LOGO touch button when all lights turn green. . |
Compass
Calibrating the Micro-bit Compass.
Before you use the compass, you need to calibrate it in the BlueBird Connector. To do this, click on the purple compass button next to the name of your device. Follow along with the video to move your Finch around in different directions to calibrate it. You will see the red lights on the Micro-bit display light, when see all of them on you should see a green check.

Once you have successfully calibrated, you can use the getCompass() method to read the value of the compass. This method requires no parameters and returns the value of the compass from 0° and 359°. 0° corresponds to the direction of magnetic north. The angle increases as the robot turns clockwise, so 90° is east, 180° is south, and 270° is west. To use the compass, the Finch must be level to the ground. Otherwise, the compass will not provide useful measurements.
CS-1 Compass Sensor Code and Lessons
The compass sensor detects the Earth magnetic field and can tell you which way the robot is facing. The numbers range from 0 to 360°. north is at zero. East is at 90° south is 180°. West is 270° and then back to north 360° interesting fact zero and 360 are the same direction.
Once you enter the code and run it you simply point the Finch robot in the direction you'd like and you'll find out what direction that is in degrees. You can keep turning the robot to different directions and you'll see a new degree appear. To end the program, you simply press the "A" button.
Simple Compass
| SC1 Block Code | copy and paste |
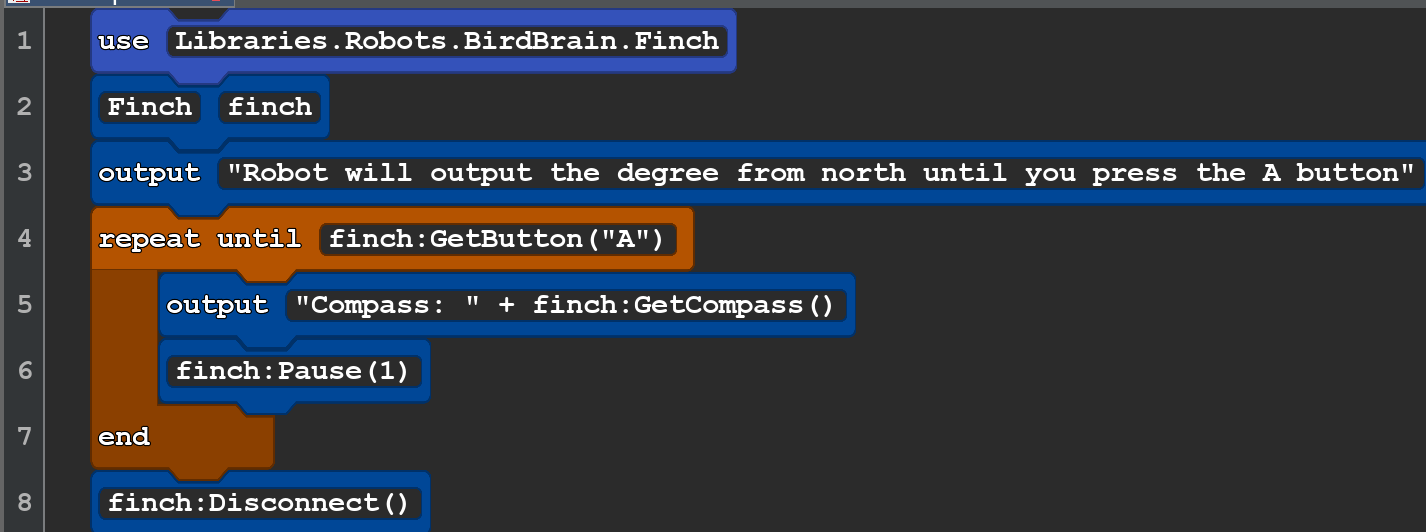 |
use Libraries.Robots.BirdBrain.Finch Finch finch output"Robot will output the degree from north until you press the A button" repeat until finch:GetButton("A") output "Compass: " + finch:GetCompass() finch:Pause(1) end finch:Disconnect() |
SC2 Compass with motor and lights
| BLOCK CODE | cut and paste |
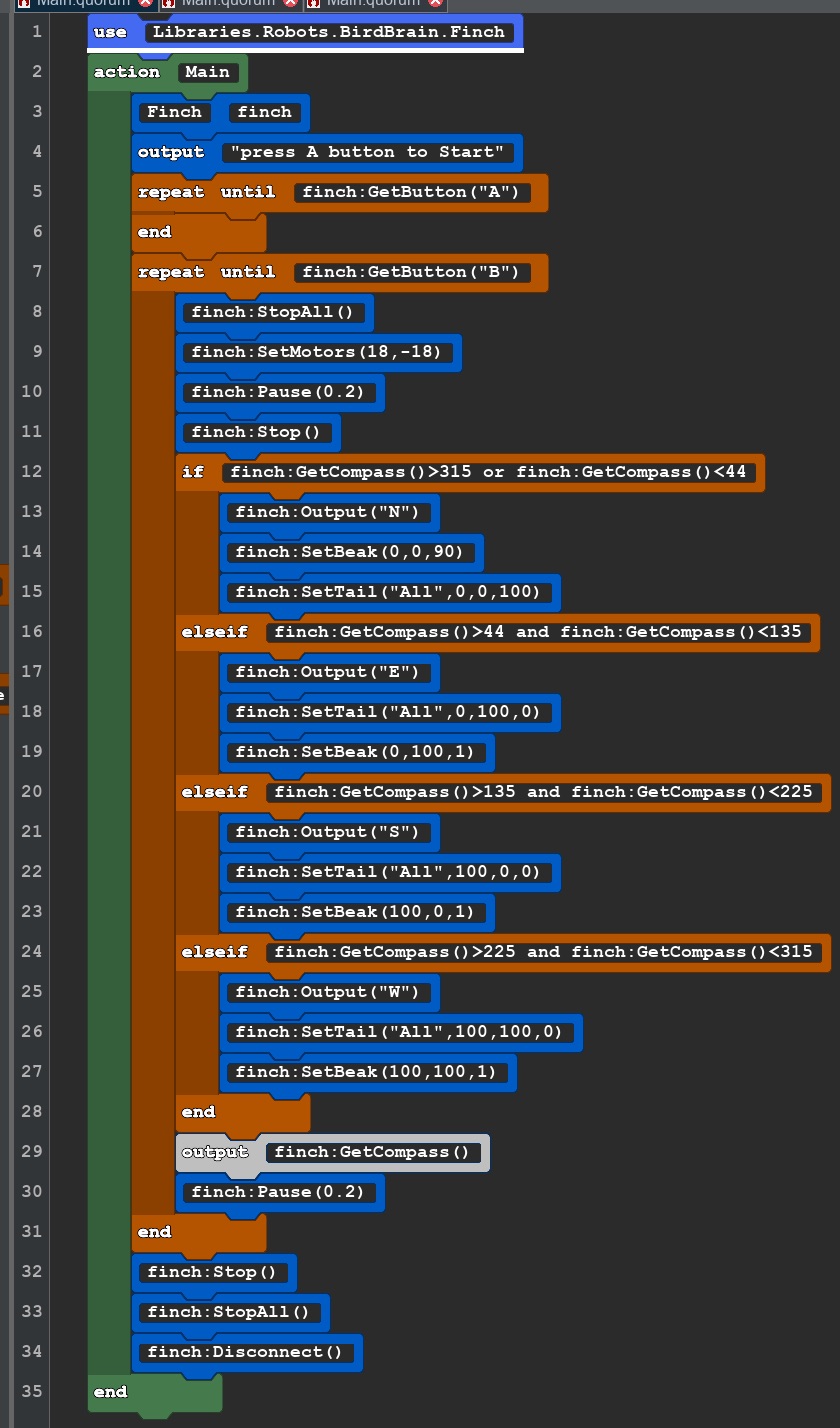 |
use Libraries.Robots.BirdBrain.Finch action Main Finch finch output "press A button to Start" repeat until finch:GetButton("A") end repeat until finch:GetButton("B") finch:StopAll() finch:SetMotors(18,-18) finch:Pause(0.2) finch:Stop() if finch:GetCompass()>315 or finch:GetCompass()<44 finch:Output("N") finch:SetBeak(0,0,90) finch:SetTail("All",0,0,100) elseif finch:GetCompass()>44 and finch:GetCompass()<135 finch:Output("E") finch:SetTail("All",0,100,0) finch:SetBeak(0,100,1) elseif finch:GetCompass()>135 and finch:GetCompass()<225 finch:Output("S") finch:SetTail("All",100,0,0) finch:SetBeak(100,0,1) elseif finch:GetCompass()>225 and finch:GetCompass()<315 finch:Output("W") finch:SetTail("All",100,100,0) finch:SetBeak(100,100,1) end output finch:GetCompass() finch:Pause(0.2) end finch:Stop() finch:StopAll() finch:Disconnect() end |
Temperature
Temperature Sensor Code and Lesson Plans
| TS1 Show Tempature on Display Block Code | Copy and paste Text code |
 |
use Libraries.Robots.BirdBrain.Finch finch:Disconnect() |
|
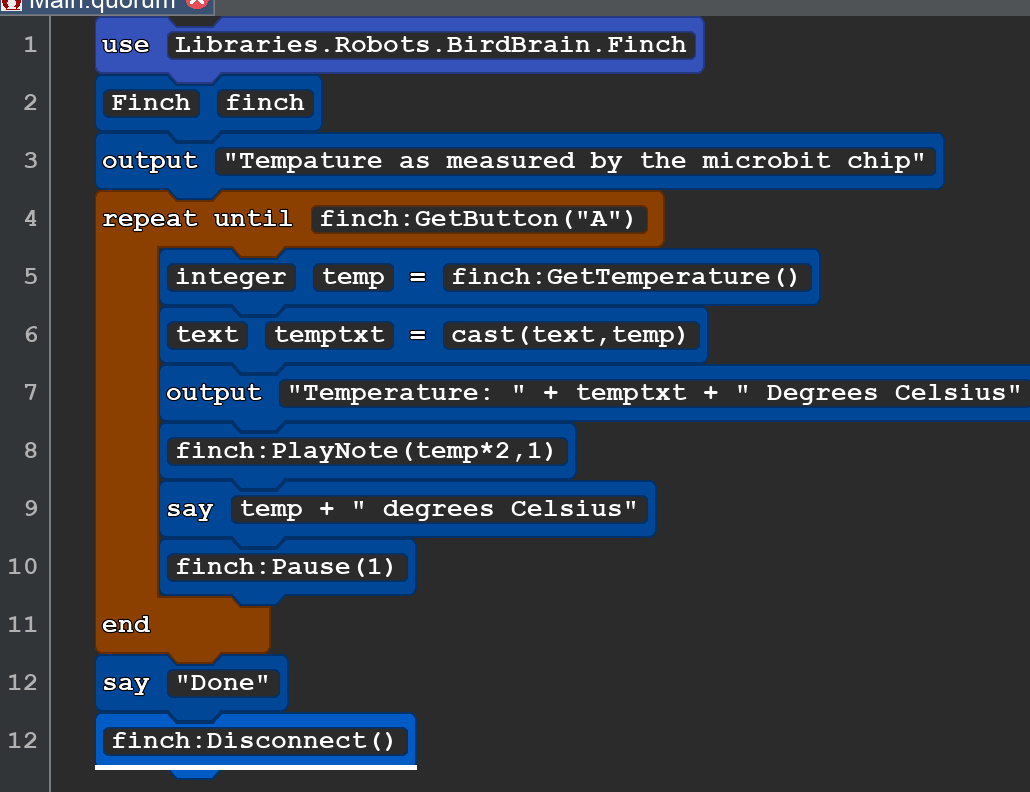
Something new: The finch gives us the tempautre as an integer. We want to have this spoken and speech needs text. Cast is the method we use to change and number or an integer in to text. (Line 6) in the last we have cast an integer in to a number. |
|
TS2 Tempetature Display
| TS2 Show Tempature on the Finch Display BlockCode | Text Code |
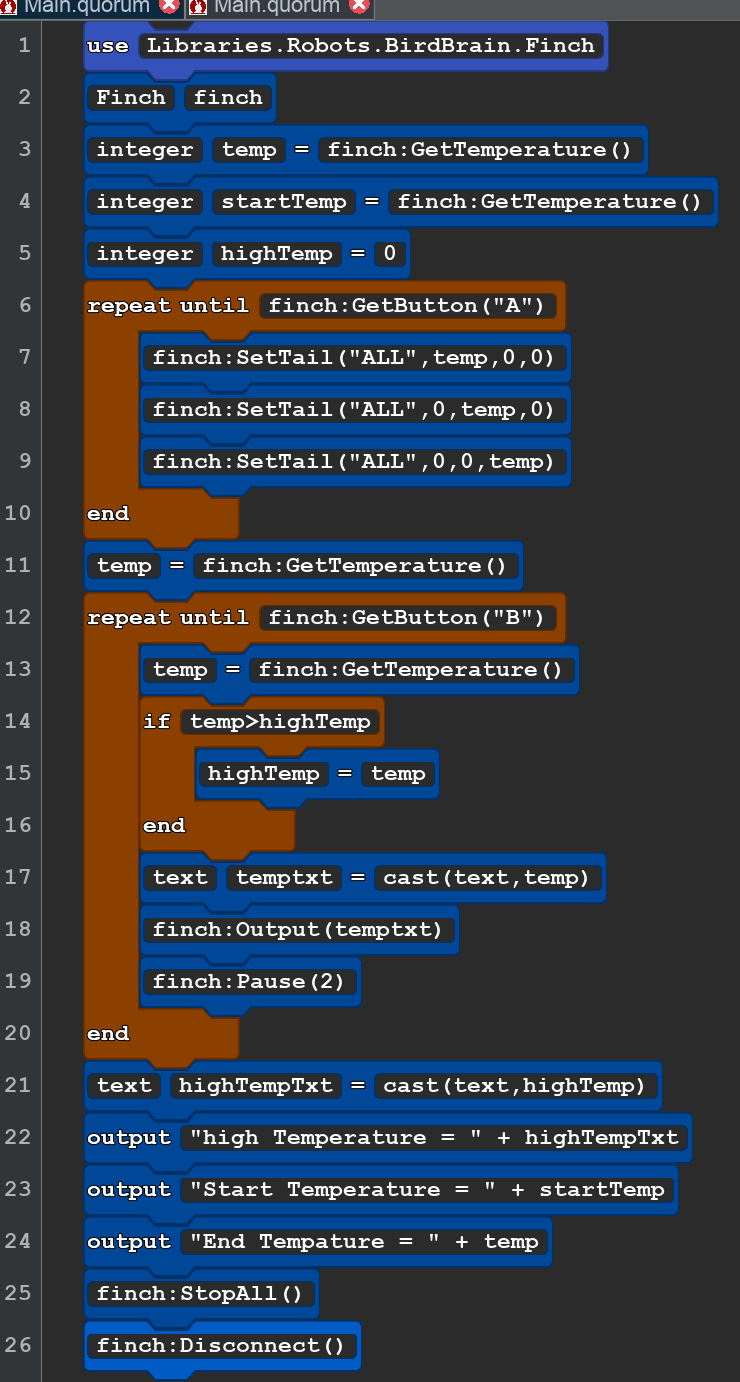 |
use Libraries.Robots.BirdBrain.Finch Finch finch integer temp = finch:GetTemperature() integer startTemp= finch:GetTemperature() integer highTemp = 0 repeat until finch:GetButton("A") finch:SetTail("ALL",temp,0,0) finch:SetTail("ALL",0,temp,0) finch:SetTail("ALL",0,0,temp) end temp=finch:GetTemperature() repeat until finch:GetButton("B") temp=finch:GetTemperature() if temp>highTemp highTemp=temp end text temptxt = cast(text,temp) finch:Output(temptxt) finch:Pause(2) end text highTempTxt = cast(text,highTemp) output "high Temperature = " + highTempTxt output "Start Temperature = " + startTemp output "End Temperature = " + temp finch:StopAll() finch:Disconnect() |
| The tempature sensor is on the processor chip on the back of the Micro-bit. |
TS3 Temperature Sensor with Centigrade and Fahrenheit
| TS3 Display Temperature in Fahrenheit. BLOCK CODE | CUT AND PASTE CODE |
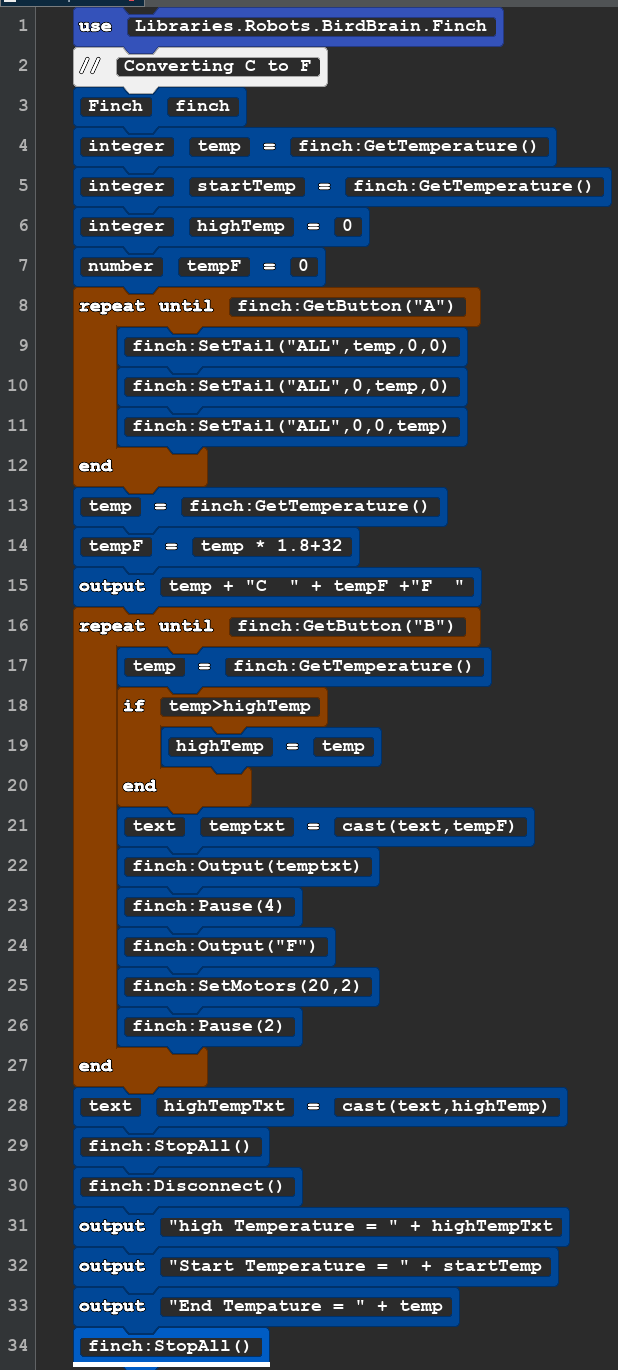 |
use Libraries.Robots.BirdBrain.Finch //Converting C to F Finch finch integer temp = finch:GetTemperature() integer startTemp= finch:GetTemperature() integer highTemp = 0 number tempF =0 repeat until finch:GetButton("A") finch:SetTail("ALL",temp,0,0) finch:SetTail("ALL",0,temp,0) finch:SetTail("ALL",0,0,temp) end temp=finch:GetTemperature() tempF = temp * 1.8+32 output temp + "C " + tempF +"F " repeat until finch:GetButton("B") temp=finch:GetTemperature() if temp>highTemp highTemp=temp end text temptxt = cast(text,tempF) finch:Output(temptxt) finch:Pause(4) finch:Output("F") finch:SetMotors(20,2) finch:Pause(2) end text highTempTxt = cast(text,highTemp) finch:StopAll() finch:Disconnect() output "high Temperature = " + highTempTxt output "Start Temperature = " + startTemp output "End Tempature = " + temp finch:StopAll() |