
Welcome to the getting started lesson plan hints and tricks
Here I will provide additional help getting started wit h the Finch 2.0 Robot and the Quorum Studio Editor.
We will discuss what you will need to get ready before starting lessons with your students.
The lessons and units you see in the main menu are written from the student or self learners viewpoint. They assume that Quorum Studio has been install and the facilitator has mastered and demonstrated how to create a project in it. As a teacher I suggest that you do two Lessons from the Quorum Language Website. There are two lessons that help how to use the Quorum Studio and the Block program system that is used by Beginner and Professioanl programers.
- Part One (Hour 1: Introduction to Computer Science) No robots here, you first need to learn how to use the IDE
- Part Two (Hour 2: Scaffolded Blocks Programming)learn how to use the IDE and Block System.
NOTE: Quorum studio is an application the works in Windows and in the Apple Macintosh OSs. It is does on work on Chromebooks or other OS or on iPads. There are other iPad and Chromebook apps that will work with the Finch 2.0 in other text and block program languages. These however are not assessable to all learner. One of the guiding principles of the Quorum Programming Language is to make the experience accessible to all learners. The focus of the website is on making a universal experience for every student. The author has experience, especially with students that are blind or have low vision.
Getting your Finch 2.0
Free Demo for 30 days for K-12 educators from BirdBraining Technologies. www.birdbraintechnologies.com/demo/
Fill out a form and get all the info you need.
You can buy a Finch 2.0 robot or a whole flock of robots at BirdBrain Technologies Store, or their Amazon Shop.
In Nebraska visit the Nebraska Libary Commision to about loan of the Finch 2.0 Kit nlc.nebraska.gov/Tech/kits/finch.aspx
Please visit your state's STEM website to learn about loans in your area.
- Getting the Finch 2.0 Robot ready
- Installing the Micro-Bit Card and Charging the Finch 2.0 Installing the Micro-Bit Card and Charging the Finch 2.0 Videos!
- Download BlueBird Connector. Mac or Windows This is the tool that runs on your computer and permit loading your computer code from Quorum Studio to the Finch using BlueTooth. It will run on the computer you are going to use with Quorum Studio.
- Using the BlueBird Connector MAC
- Using the BlueBird Connector Windows
- Connecting - once you have installed the microbit card and have BlueBird Connect running Turn on the Finch 2.0 using the big black button on the bottom of the Finch. On the front display of the Micro:bit you should see 3 letters flashing one at time. You should see the same letters (and some cool words to match them) on the BlueBird Window. Click on it and it will activiate the link between the Finc h 2.0 and your computer. (bluetooth)
- If you don't see the 3 letters flashing on the Micro:bit that may mean that the BitFirmware.hex file was not properly downloaded onto your micro:bit. If you are having trouble downloading the provided BitFirmware.hex file, see the article titled, “Why is my BitFirmware.hex file not showing up on my micro:bit?”
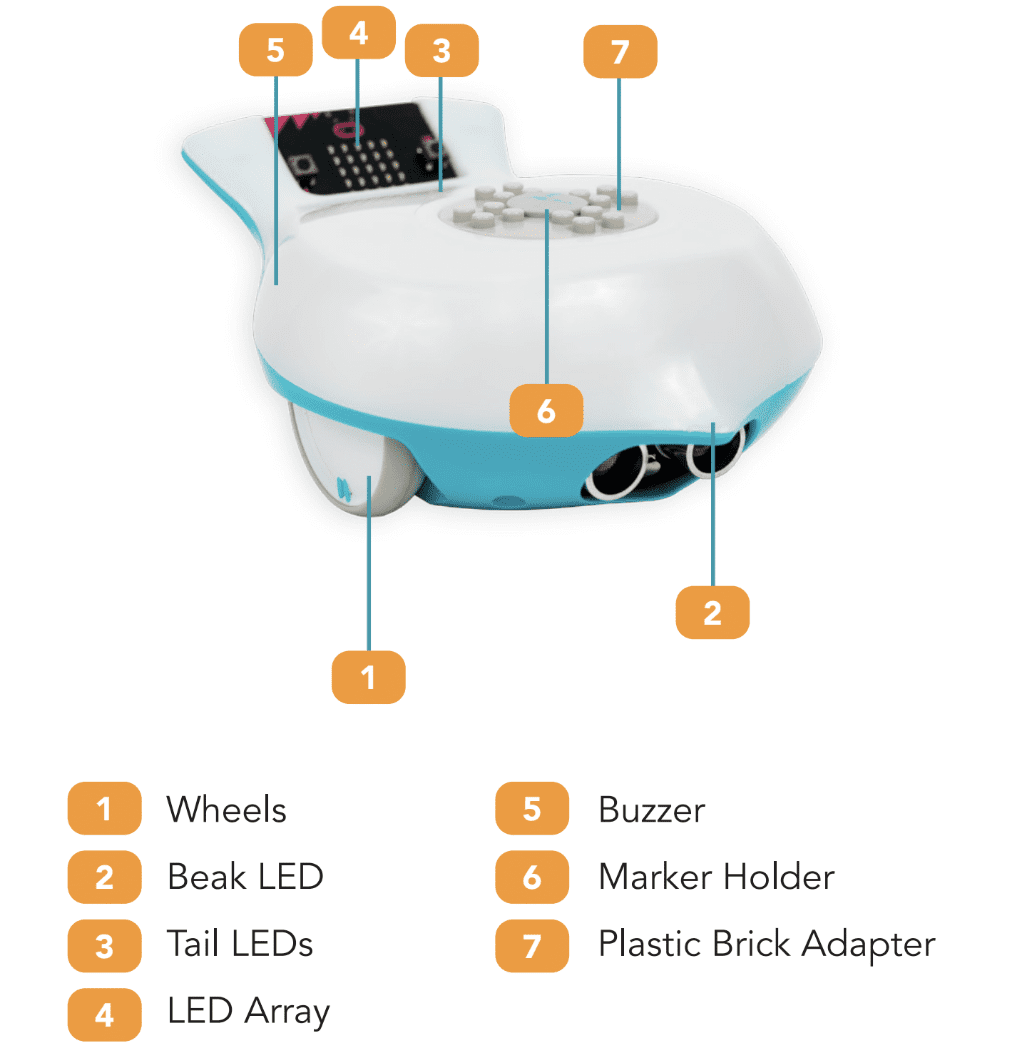
Parts of the Finch 2.0 Robot
Updating the Microbit firmware Link from BirdBrain Tech
Dowlnload the BitFirmware.hex file. Write instructions for this
You and your students should now be ready to write the computer code to make things happen with the Finch 2.0 Robot.
Start with the 4 beginning Lessons B1-B4
Then it is sugested to do the
These lessons build on each others if done in the suggested order.